Translate

Total Pageviews

Monday, October 12, 2009

CLAY MOULDING

ABOUT:
By using the following method and materials we can make a clay basket and different types of fruits, well arranged in the basket.

THINGS NEEDED:
China clay - 1/2 kg (approx.)
Ceramic Powder- 1/2kg(approx)
Ceramic tile- 1 piece (12x8 or 12x12 size)
Fabric Paint -Different Colours
Varnish -1 bottle
Glue.

ACCESSORIES:
Brushes
Roller
Knife

PROCEDURE:
1.Mix together China clay, ceramic powder and glue, and make it into a dough.

2.Take small quantity of this dough and roll them into balls of various sizes to make grapes.
Make 40-50 of them and paint purple.  Same way shape up apples, bananas, oranges and whatever fruits you want to make.  Color them and once the color dries up, varnish them.

3.To make leaves, take small quantity of the dough and roll it using the roller.
Cut it in the shapes of leaves (various shapes) and paint them green when dry, varnish them.

4.To make a basket take a portion of dough and flatten it and cut it out in the shape.  Few horizontal lines and in between few vertical lines are pressed over the dough to get the shape of the basket.
Two small strings should be made with the dough and it should be twisted or plaited neatly and pasted to the top and bottom of the basket.
Now paint the basket with brown and black colours and varnish it.


FINISHING TOUCHES:
Take a Ceramic plate.
Wash it and let it dry.
First using glue, stick the three sides of your basket on the tile.
The top portion should be kept open. Fill the basket with clay dough to the brim.
Now arrange the fruits on the top portion of the basket.
Stick them in a beautiful way.
If a small piece of magnet is stuck at the back of each fruit it can be put up can separately on any metal piece.
This can even decorate our refrigerators.

Keep this fruit basket on a wooden stand. It will add decor to your dining or kitchen or even living room.

Saturday, October 10, 2009

BATIK DESIGN

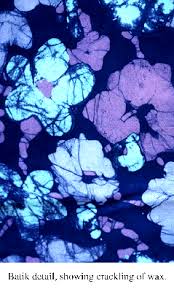
Batik is an ancient art supposed to be 2000 years old.The formation of crackles between colours is the interesting and beautiful part of this dying. To get crackle effect, wax is mixed with resin and used.
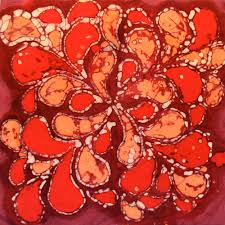
Now just try a very simple design of circles.

Materials Required-Cotton or silk cloth - take a square piece of any size

Dyes - Usually napthol dyes are used .

Colours used for the design - yellow, red, brown, black.

Wax - Bee wax, paraffin wax resin (gum)

Brush - A small water colour brush,
a 1/2" size and a 2" size of the ordinary household paint brush.
These brushes can be used only for waxing.

Vessel to heat wax

Plastic bucket or big bowls to mix colours

A frame to fix the cloth

Gloves


Procedure :

Preparing the cloth :
Wash the cloth and starch it lightly. Starching is done to control the flow of wax.
Iron the cloth before you begin. Always choose white colour cloth or very light shade.
Now draw the design of circles on the cloth with charcoal or crayon and pin it to a frame.

Waxing & Dyeing : Use gloves while preparing wax and dye.

Preparing the wax :
Take 2 parts of bee wax and one part of paraffin wax into a vessel and heat it.
When it becomes liquid, add resin to it.
As wax is inflammable, use an electric heater or hot plate and avoid direct flame for heating.
Wax should be hot enough to penetrate the cloth. i.e. it should reach both sides of the material. The wax should look clear and not milky, to penetrate the cloth.
If the wax lies on the surface of the cloth, the dye will run under it and the resulting batik design will look smudgy.
To test whether the wax is of the right consistency, take a rough piece of cloth and apply the hot wax and see if the wax reaches both the sides of the material.

Preparing the dye bath :
Mix the dye with cold water.
The preparation should be mixed according to the directions given but not diluted too much.

Crackle :
Crackle is formed when the waxed cloth is dipped in the cold dye bath.
The wax cracks causing veins of darker colour on the lighter areas.
To have more crackle effects on the design the proportion of wax could be reversed to one part bee wax and two parts paraffin wax adding a little resin.
Paraffin wax crackles faster than bee wax.
The full effect of crackling can be seen when the wax is ironed out or removed by boiling

Applying the Wax & Dye :
Start waxing using a small brush changing to a larger size for broader areas.
Paint with good, even strokes about 1/4inch inside the line of your design.
When the brush is immersed in hot wax for the first time, the bristles will fuzz out.
Press them back into shape on the sides of the pan.
The layer of wax should not be very thin. Keep on h eating the wax while applying to retain the
clear consistency. Avoid crushing the cloth before dipping in the dye bath.
It can lead to too many crackles.
Wax should be 1st applied only on regions where you need white colour. i.e. the centre circle. When it dries the fabric should be dipped in the 1st light colour yellow.
Keep the cloth in the dye bath for about 15 minutes.
Remove and dry it by hanging on a line or flat on a news paper.
After drying, wax the regions where you need yellow.
Dip it in the next colour red, when it dries.
Now wax the regions where you need red.
Now dip brown. When it dries wax the regions where you need brown.
Final immersion is in black dye.
To achieve a good crackle effect the material is crumbled before the last immersion.

Dewaxing :
The final stage after dyeing and waxing. Now it is time to remove the wax from the cloth.
Wax can be removed by ironing with a moderately hot iron.
Keep a good layer of newspaper underneath the material and a single sheet on top while ironing. The paper absorbs the extra wax.
The paper should be renewed as they become soaked with wax.
If too much wax is remaining even after ironing the cloth should be dry cleaned.
Now the cloth is ready to use.
Try out this with any design, according to your idea to make a wonderful garment for yourself.

Thursday, October 1, 2009

PAINTING ON PEEPAL LEAF

ABOUT:  In India Hindus hold the great spiritual regard for the peepal tree and this tree has great importance among the Buddhists,  as Lord Buddha attained enlightenment mediating under the Peepal tree.  From bark of the Peepal tree reddish dye is extracted. Peepal leaves are used as ear drops and used to heal the wounds.

Painting on Peepal leaf is one of the oldest form of art, and shows the patience of the artists.
It is a delicate work of art originated in the southern India that is in Kerala.  Its done on dry Peepal leaves.
This art form originated because the leaves of the peepal tree have a beautiful shape as they traper to a needle point.  Nowadays only a few arists are left who practice this leaf art.  Peepal Leaf Painting is great for making cards, wall hangings, book marks, gifts etc.  Typically themes are painted in peepal leaves are Religious Indian figures, Animals, Scenery.  But we can experiment with modern abstract art also.

MATERIAL REQUIRED:
1)Peepal leaves.   2)Oil paints.   3)Back ground sheet for leaf


Method:

The method is divided into 2 process
1. Drying the leaves 
2. Painting on leaves

1 .Drying the leaves:
Place a few leaves in a bowl full of water for15 days or a month .Do remember to check it once every few days to see the condition of the leaves. The purpose of soaking the leaves is to remove the outer layer of the leaves. After being in water for long, the leaves get a film over them, which you need to clean by washing it off or use a brush periodically. Do remember to change the water with a fresh one periodically. Once the outer skin is lost, it leaves behind a beautiful bony structure and usually it will be off-white in color.Now dry it for a day and you get a leaf for painting.

2.Painting on leaves :
Use oil paints to paint your favorite design on the peepal leaves.  Usually brown, green colors for leaf and related colors to the design are used.  Use a color that will enhance the effect of the painting.The background is usually kept because Peepal leaves are very fragile and may rupture.  Put a colored sheet for background.

TIPS:
1)The most important tip is to be patient, while drying peepal leaves and handle them with care.
2)Add glitter to enhance the look of the painting.
3)Can also paint the peepal leaf in two colors to give half and half look.
4)Use golden color to make a border or highlighting or making jewellery
5)Cover with transparent sheet to protect the work.
6)Many wedding cards are decorated with dry peepal leaves.

.

Friday, September 25, 2009

CERAMIC PAINTING

Materials Required:
A Plate
Camel texture white
Camel Acrylic gloss medium
A design
Carbon paper
Pencil
Oil Paints
Brushes
Procedure :
Take the plate and clean it well.
Trace the design on to the plate using a carbon paper.
Give the outline of the design using a cone filled with Camel texture white.
Wait till the outline dries.
Now paint the design with oil paints. Choose colours according to your taste.
It takes 2-3 days to dry.
After drying apply camel acrylic gloss medium onto the plate. It gives a glossy finish to the painting and also helps it to last long.
Your ceramic painting is ready.
To make a cone:
Take a thick plastic cover or sheet, roll it in the shape of a cone and stick the edges. Fill the paste inside the cone and close it sticking the ends tightly. Make a small hole with a pin at the tip of the cone. The fine paste can be squeezed out in a thin strand. This can be used to give the out line of the design in the plate

TYPES OF GLASS PAINT

Materials :

1.Square Glass piece
2.Boldly traced design
3.Talcum powder
4.Glass paint Thinner
4.M-Seal or lead tube
5.Glue
6.Brushes

METHOD:
 1.Traced design is placed on the table and the plain glass is placed above the design, so that the design is clearly seen through the glass.
2.Mix the two colored pastes of the m-seal in equal proportion to get a wax finish.  Roll the dough (M-seal Mixture) into thin and even strings, with the help of talcum powder. 3.This string is stuck with glue over the glass on the outline of the trace which is kept under the glass and allowed to dry.
4.Color it with black glass paint, when it dries.
5.Fill design by suitable glass paints with the help of brushes.
6.When the whole painting and the m-seal border gets dried, remove the trace.
7.Now frame the glass piece.
.

TIPS:

1.While sticking M-seal string on glass,  glass piece should not move from design.
2.Before start painting the color,test your shades on the corner of the glass and wipe it off with the thinner.
3.The color choice should be perfect because the stained glass paint gets dried up fast and the correction cannot be done easily.
4.While painting, the color blending should be done quickly and carefully. When the whole painting and the mseal border gets dried, remove the trace.


NIB PAINTING

ABOUT:
Nib painting looks really beautiful after it is completed, but need a lot of patience as it is time consuming and takes around ten days time to become dry.  It looks almost like an embroidery work.

ITEMS REQUIRED:
A.For nib painting 3-types of nibs are needed and are available in stationery shops along with oil paints and other materials.  Now a days nib paint kit is available including everything needed.
1)Round nib-round tip to do circle designs.
2)long nib-long tip to do long lines.
3)flat nib-short painted tip to draw small sharp lines.
B.Design
C.Felt cloth
D.hard board
E.oil paint
F.tracing paper
G.pencil carbon
H.glue.


METHOD:

1.Using glue, stick the felt cloth on the hard board.
2.Use white carbon paper to trace the design on the felt cloth(white lines are visible on black felt cloth).
3.Put the paint straight onto the felt. Press on it or score on the paint using the nib. Wherever a round design is required use the nib with round tip and wherever the small sharp lines are drawn short pointed tip nib is used. Generally long tip nib is used to do the lines. You can also take the paint on the nib and press it against the surface to create the design.
4.You may take 2-3 days to finish off with a design. The design will dry off very slowly, say by 10- days or more. The consistency of the paint is very thick.
5.After the design is fully dried, get it framed.


TIPS:
1.Two things should be always taken care while doing nib painting.
 1) you should always start painting from top so as to move your hand freely towards down part.
 2)you should move your hand evenly while doing your painting. This gives the painting a real look.
2.Decide on the color scheme of your design. Usually floral designs and scenery go well with nib          painting.
3.Select the shades as per the design and if you mix two colors to get the double shade combination it will look really good.Since the petals are not of the same shade, white and pink paint should be used in good combination to get the double shade.
4.The felt can get dirty,  but can be easily removed with thick dry brushes or with tooth brush.
tissue paper also can be used.

METAL ENGRAVING

Materials
Aluminium sheet
Metal Tools
Glass paints
Brush
Black enamel paint
Method
Stick the four corners of the trace of the decided design on the metal sheet. Using a ball pointed pen draw over the trace applying force. As the metal sheet is quite fragile, the impression of the traced out line will be prominent on the aluminium sheet. Since force is applied on the trace, it cannot be used again. Take a designer tool and press over the traced out line turning the wrist to the right and left during each press, so that a designed out line comes on the picture.
Now using the scrape tool, scrape off the aluminium neatly on the design towards one direction without spoiling the outline. So that the picture will have a perfect look. Paint the picture with glass paint. To make the art attractive paint the back ground of the picture with black enamel paint. This is a good piece of art which can be hung in the house, shops, and hotels

POT PAINTING

ABOUT:   Pot painting plays an important role in ARTnCRAFT area.
We can paint only on clay pot in the given methods.

METHOD-1
Materials Required :
Pot
Sand paper
cloth
Container
Water
Enamel paints in different colors.
PROCEDURE :
At first keep your pot in a bucket full of water for a night, make it dry by keeping in sunlight for a day.
Rub the outer surface of the pot with sand paper to make the pot smooth.
Clean the pot with dry cloth.
Now take a container containing three-fourth quantity of water and spill different colours of enamel paints into it.
The different colour paints float on the water.
Now gently hold your painted pot at its edge and dip it into the water and twist it around in the water and slowly take it out of the container.
Keep the pot aside without disturbing it.
The wet paints will slowly take its own design and shade.
Wait till the pot dries.
Your pot painting is ready.
This art each time you do it, you get a different design.
TIPS:
The more shades of paints you spill in the water, the more colourful and beautiful the pot will become.
Do not disturb or shake the pot after it is taken out of the water.


METHOD-2
Materials Required :
Pot
Sandpaper
White cement
Ceramic powder(or)Chalk Powder
Fevicol
Bowl
Fevicryl
Metallic colors
Brush

PROCEDURE:
At first, keep your pot in a bucket full of water for a night, make it dry by keeping in sunlight for a day.  Rub the outer surface of the pot with sand paper to keep the pot smooth. 
Take some white cement powder and mix it with water in a bowl, coat a layer on pot with brush. 
Once again use sandpaper to make surface smooth.  Allow pot to dry.
Paint it with fevicryl metallic color of your choice.
Your pot is ready for decoration.
Take chalk or ceramic powder and fevicol in 1:2 ratio in a bowl, mix it well to make a dough.
To make small jasmine flowers to decorate, Take a small dough, smooth it, keep at the center of the left hand.  Hold a pencil base with right hand, press in the middle of the dough and turn the pencil base in clockwise direction.  To make roses, you have to prepare petals first and stick them in order.  Let the flowers dry
Now apply fevicryl and stick flowers wherever you want.
color the flowers as you wish.
Tips:
Firs of all, we should have an idea about- in what type of design and flowers we are going to do on pot.
In this way you can do fruits like grapes, sceneries etc,. 

Method 3
Materials Required :
Earthen pot
Brush
Enamel paints
Fabric paint (Fevicryl)
Tooth brush

PROCEDURE:
First, color your earthen pot with enamel paint.
Keep it aside for 10 minutes.
Later, take a fabric paint (contrast colour to the enamel paint) onto the bristles of the tooth brush.
Now using your fingers, sprinkle the paint from the tooth brush onto your painted pot.
After 20 minutes, blend the same fabric colour used onto the pot with a painting brush.
Now keep it for drying under the sun. It will give a cracked effect.
Your pot is now ready.
Tips :
Use light shade paints as the base colours and dark colours for sprinkling.

LEAF PAINTING

ABOUT:  Painting on fabrics can be made more attractive with leaf painting.  Any one can tryout this method and can do their work with very less efforts and time.  Can make good designs on your saris, shawls, tablecloths, curtains, dresses, shirts, as you wish.


MATERIALS REQUIRED:
Cloth
Suitable colors of Fabric paints
Palette
Brushes
Different shapes and different sizes of thick veined leaves having curved edges

METHOD:
First mark the places on fabric as designer,where design is required.
Paint the backside or wrong side of the leaf, completely with the selected color help of a brush.
Stick the leaf on the cloth and press well.
Keep the fabric in sunlight for an hour, otherwise leave it dry for 24 hours.
Iron the cloth backside of the design for long lasting purpose


TIPS and TRICKS:
The beautyness of the print completely depends on the color combinations you have selected.                                                                     If the cloth is light, then dark color paints will look beautiful and vice versa.
Before painting, iron the cloth to avoid wrinkles.
Before making the print on the good material, it is better to have a trial on the rough cloth.You can use
Ironing should be done only after drying.
To give richness to the painting, you can use thin and beautiful laces, kundans, beads, chem keys.


Different colors on same leaf also you can try as shown in the image.