Materials Required:
A Plate
Camel texture white
Camel Acrylic gloss medium
A design
Carbon paper
Pencil
Oil Paints
Brushes
Procedure :
Take the plate and clean it well.
Trace the design on to the plate using a carbon paper.
Give the outline of the design using a cone filled with Camel texture white.
Wait till the outline dries.
Now paint the design with oil paints. Choose colours according to your taste.
It takes 2-3 days to dry.
After drying apply camel acrylic gloss medium onto the plate. It gives a glossy finish to the painting and also helps it to last long.
Your ceramic painting is ready.
To make a cone:
Take a thick plastic cover or sheet, roll it in the shape of a cone and stick the edges. Fill the paste inside the cone and close it sticking the ends tightly. Make a small hole with a pin at the tip of the cone. The fine paste can be squeezed out in a thin strand. This can be used to give the out line of the design in the plate
Friday, September 25, 2009
TYPES OF GLASS PAINT
 Materials :
1.Square Glass piece2.Boldly traced design
3.Talcum powder
4.Glass paint Thinner
4.M-Seal or lead tube
5.Glue
6.Brushes
METHOD:
2.Mix the two colored pastes of the m-seal in equal proportion to get a wax finish. Roll the dough (M-seal Mixture) into thin and even strings, with the help of talcum powder. 3.This string is stuck with glue over the glass on the outline of the trace which is kept under the glass and allowed to dry.
4.Color it with black glass paint, when it dries.
5.Fill design by suitable glass paints with the help of brushes.
6.When the whole painting and the m-seal border gets dried, remove the trace.
7.Now frame the glass piece.
.
TIPS:
1.While sticking M-seal string on glass, glass piece should not move from design.
2.Before start painting the color,test your shades on the corner of the glass and wipe it off with the thinner.
3.The color choice should be perfect because the stained glass paint gets dried up fast and the correction cannot be done easily.
4.While painting, the color blending should be done quickly and carefully. When the whole painting and the mseal border gets dried, remove the trace.
NIB PAINTING
ABOUT:
Nib painting looks really beautiful after it is completed, but need a lot of patience as it is time consuming and takes around ten days time to become dry. It looks almost like an embroidery work.
ITEMS REQUIRED:
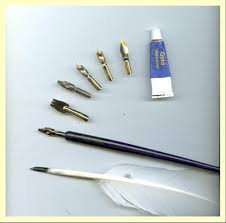
A.For nib painting 3-types of nibs are needed and are available in stationery shops along with oil paints and other materials. Now a days nib paint kit is available including everything needed.
1)Round nib-round tip to do circle designs.
2)long nib-long tip to do long lines.
3)flat nib-short painted tip to draw small sharp lines.
B.Design
C.Felt cloth
D.hard board
E.oil paint
F.tracing paper
G.pencil carbon
H.glue.
METHOD:
1.Using glue, stick the felt cloth on the hard board.
2.Use white carbon paper to trace the design on the felt cloth(white lines are visible on black felt cloth).
3.Put the paint straight onto the felt. Press on it or score on the paint using the nib. Wherever a round design is required use the nib with round tip and wherever the small sharp lines are drawn short pointed tip nib is used. Generally long tip nib is used to do the lines. You can also take the paint on the nib and press it against the surface to create the design.
4.You may take 2-3 days to finish off with a design. The design will dry off very slowly, say by 10- days or more. The consistency of the paint is very thick.
5.After the design is fully dried, get it framed.

TIPS:
1.Two things should be always taken care while doing nib painting.
1) you should always start painting from top so as to move your hand freely towards down part.
2)you should move your hand evenly while doing your painting. This gives the painting a real look.
2.Decide on the color scheme of your design. Usually floral designs and scenery go well with nib painting.
3.Select the shades as per the design and if you mix two colors to get the double shade combination it will look really good.Since the petals are not of the same shade, white and pink paint should be used in good combination to get the double shade.
4.The felt can get dirty, but can be easily removed with thick dry brushes or with tooth brush.
tissue paper also can be used.
Nib painting looks really beautiful after it is completed, but need a lot of patience as it is time consuming and takes around ten days time to become dry. It looks almost like an embroidery work.
ITEMS REQUIRED:
A.For nib painting 3-types of nibs are needed and are available in stationery shops along with oil paints and other materials. Now a days nib paint kit is available including everything needed.
1)Round nib-round tip to do circle designs.
2)long nib-long tip to do long lines.
3)flat nib-short painted tip to draw small sharp lines.
B.Design
C.Felt cloth
D.hard board
E.oil paint
F.tracing paper
G.pencil carbon
H.glue.
METHOD:
1.Using glue, stick the felt cloth on the hard board.
2.Use white carbon paper to trace the design on the felt cloth(white lines are visible on black felt cloth).
3.Put the paint straight onto the felt. Press on it or score on the paint using the nib. Wherever a round design is required use the nib with round tip and wherever the small sharp lines are drawn short pointed tip nib is used. Generally long tip nib is used to do the lines. You can also take the paint on the nib and press it against the surface to create the design.
4.You may take 2-3 days to finish off with a design. The design will dry off very slowly, say by 10- days or more. The consistency of the paint is very thick.
5.After the design is fully dried, get it framed.

TIPS:
1.Two things should be always taken care while doing nib painting.
1) you should always start painting from top so as to move your hand freely towards down part.
2)you should move your hand evenly while doing your painting. This gives the painting a real look.
2.Decide on the color scheme of your design. Usually floral designs and scenery go well with nib painting.
3.Select the shades as per the design and if you mix two colors to get the double shade combination it will look really good.Since the petals are not of the same shade, white and pink paint should be used in good combination to get the double shade.
4.The felt can get dirty, but can be easily removed with thick dry brushes or with tooth brush.
tissue paper also can be used.
METAL ENGRAVING
Materials
Aluminium sheet
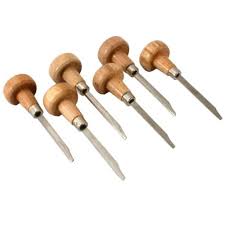
Metal Tools
Glass paints
Brush
Black enamel paint
Method
Stick the four corners of the trace of the decided design on the metal sheet. Using a ball pointed pen draw over the trace applying force. As the metal sheet is quite fragile, the impression of the traced out line will be prominent on the aluminium sheet. Since force is applied on the trace, it cannot be used again. Take a designer tool and press over the traced out line turning the wrist to the right and left during each press, so that a designed out line comes on the picture.
Now using the scrape tool, scrape off the aluminium neatly on the design towards one direction without spoiling the outline. So that the picture will have a perfect look. Paint the picture with glass paint. To make the art attractive paint the back ground of the picture with black enamel paint. This is a good piece of art which can be hung in the house, shops, and hotels
Aluminium sheet
Metal Tools
Glass paints
Brush
Black enamel paint
Method
Stick the four corners of the trace of the decided design on the metal sheet. Using a ball pointed pen draw over the trace applying force. As the metal sheet is quite fragile, the impression of the traced out line will be prominent on the aluminium sheet. Since force is applied on the trace, it cannot be used again. Take a designer tool and press over the traced out line turning the wrist to the right and left during each press, so that a designed out line comes on the picture.
Now using the scrape tool, scrape off the aluminium neatly on the design towards one direction without spoiling the outline. So that the picture will have a perfect look. Paint the picture with glass paint. To make the art attractive paint the back ground of the picture with black enamel paint. This is a good piece of art which can be hung in the house, shops, and hotels
POT PAINTING
ABOUT: Pot painting plays an important role in ARTnCRAFT area.
We can paint only on clay pot in the given methods.
METHOD-1
Materials Required :
Pot
Sand paper
cloth
Container
Water
Enamel paints in different colors.
PROCEDURE :
At first keep your pot in a bucket full of water for a night, make it dry by keeping in sunlight for a day.
Rub the outer surface of the pot with sand paper to make the pot smooth.
Clean the pot with dry cloth.
Now take a container containing three-fourth quantity of water and spill different colours of enamel paints into it.
The different colour paints float on the water.
Now gently hold your painted pot at its edge and dip it into the water and twist it around in the water and slowly take it out of the container.
Keep the pot aside without disturbing it.
 The wet paints will slowly take its own design and shade.
Wait till the pot dries.
Your pot painting is ready.
This art each time you do it, you get a different design.
TIPS:
The more shades of paints you spill in the water, the more colourful and beautiful the pot will become.
Do not disturb or shake the pot after it is taken out of the water.
METHOD-2
Materials Required :
Pot
Sandpaper
White cement
Ceramic powder(or)Chalk Powder
Fevicol
Bowl
Fevicryl
Metallic colors
Brush
PROCEDURE:
At first, keep your pot in a bucket full of water for a night, make it dry by keeping in sunlight for a day. Rub the outer surface of the pot with sand paper to keep the pot smooth.
Take some white cement powder and mix it with water in a bowl, coat a layer on pot with brush.
Once again use sandpaper to make surface smooth. Allow pot to dry.
 Paint it with fevicryl metallic color of your choice.
Your pot is ready for decoration.
Take chalk or ceramic powder and fevicol in 1:2 ratio in a bowl, mix it well to make a dough.
To make small jasmine flowers to decorate, Take a small dough, smooth it, keep at the center of the left hand. Hold a pencil base with right hand, press in the middle of the dough and turn the pencil base in clockwise direction. To make roses, you have to prepare petals first and stick them in order. Let the flowers dry
Now apply fevicryl and stick flowers wherever you want.
color the flowers as you wish.
Tips:
Firs of all, we should have an idea about- in what type of design and flowers we are going to do on pot.
Method 3
Materials Required :
Earthen pot
Brush
Enamel paints
Fabric paint (Fevicryl)
Tooth brush

PROCEDURE:
First, color your earthen pot with enamel paint.
Keep it aside for 10 minutes.
Later, take a fabric paint (contrast colour to the enamel paint) onto the bristles of the tooth brush.
Now using your fingers, sprinkle the paint from the tooth brush onto your painted pot.
After 20 minutes, blend the same fabric colour used onto the pot with a painting brush.
Now keep it for drying under the sun. It will give a cracked effect.
Your pot is now ready.
Tips :
Use light shade paints as the base colours and dark colours for sprinkling.
We can paint only on clay pot in the given methods.
METHOD-1
Materials Required :
Pot
Sand paper
cloth
Container
Water
Enamel paints in different colors.
PROCEDURE :
At first keep your pot in a bucket full of water for a night, make it dry by keeping in sunlight for a day.
Rub the outer surface of the pot with sand paper to make the pot smooth.
Clean the pot with dry cloth.
Now take a container containing three-fourth quantity of water and spill different colours of enamel paints into it.
The different colour paints float on the water.
Now gently hold your painted pot at its edge and dip it into the water and twist it around in the water and slowly take it out of the container.
Keep the pot aside without disturbing it.
Wait till the pot dries.
Your pot painting is ready.
This art each time you do it, you get a different design.
TIPS:
The more shades of paints you spill in the water, the more colourful and beautiful the pot will become.
Do not disturb or shake the pot after it is taken out of the water.
METHOD-2
Materials Required :
Pot
Sandpaper
White cement
Ceramic powder(or)Chalk Powder
Fevicol
Bowl
Fevicryl
Metallic colors
Brush
PROCEDURE:
At first, keep your pot in a bucket full of water for a night, make it dry by keeping in sunlight for a day. Rub the outer surface of the pot with sand paper to keep the pot smooth.
Take some white cement powder and mix it with water in a bowl, coat a layer on pot with brush.
Once again use sandpaper to make surface smooth. Allow pot to dry.
Your pot is ready for decoration.
Take chalk or ceramic powder and fevicol in 1:2 ratio in a bowl, mix it well to make a dough.
To make small jasmine flowers to decorate, Take a small dough, smooth it, keep at the center of the left hand. Hold a pencil base with right hand, press in the middle of the dough and turn the pencil base in clockwise direction. To make roses, you have to prepare petals first and stick them in order. Let the flowers dry
Now apply fevicryl and stick flowers wherever you want.
color the flowers as you wish.
Tips:
Firs of all, we should have an idea about- in what type of design and flowers we are going to do on pot.
In this way you can do fruits like grapes, sceneries etc,.
Method 3
Materials Required :
Earthen pot
Brush
Enamel paints
Fabric paint (Fevicryl)
Tooth brush
PROCEDURE:
First, color your earthen pot with enamel paint.
Keep it aside for 10 minutes.
Later, take a fabric paint (contrast colour to the enamel paint) onto the bristles of the tooth brush.
Now using your fingers, sprinkle the paint from the tooth brush onto your painted pot.
After 20 minutes, blend the same fabric colour used onto the pot with a painting brush.
Now keep it for drying under the sun. It will give a cracked effect.
Your pot is now ready.
Tips :
Use light shade paints as the base colours and dark colours for sprinkling.
LEAF PAINTING
ABOUT: Painting on fabrics can be made more attractive with leaf painting. Any one can tryout this method and can do their work with very less efforts and time. Can make good designs on your saris, shawls, tablecloths, curtains, dresses, shirts, as you wish.

MATERIALS REQUIRED:
Cloth
Suitable colors of Fabric paints
Palette
Brushes
Different shapes and different sizes of thick veined leaves having curved edges
METHOD:
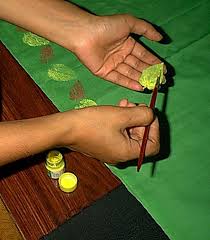
First mark the places on fabric as designer,where design is required.
Paint the backside or wrong side of the leaf, completely with the selected color help of a brush.
Stick the leaf on the cloth and press well.
Keep the fabric in sunlight for an hour, otherwise leave it dry for 24 hours.
Iron the cloth backside of the design for long lasting purpose
TIPS and TRICKS:
The beautyness of the print completely depends on the color combinations you have selected. If the cloth is light, then dark color paints will look beautiful and vice versa.
Before painting, iron the cloth to avoid wrinkles.
Before making the print on the good material, it is better to have a trial on the rough cloth.You can use
Ironing should be done only after drying.
To give richness to the painting, you can use thin and beautiful laces, kundans, beads, chem keys.

Different colors on same leaf also you can try as shown in the image.
MATERIALS REQUIRED:
Cloth
Suitable colors of Fabric paints
Palette
Brushes
Different shapes and different sizes of thick veined leaves having curved edges
METHOD:
First mark the places on fabric as designer,where design is required.
Paint the backside or wrong side of the leaf, completely with the selected color help of a brush.
Stick the leaf on the cloth and press well.
Keep the fabric in sunlight for an hour, otherwise leave it dry for 24 hours.
Iron the cloth backside of the design for long lasting purpose
TIPS and TRICKS:
The beautyness of the print completely depends on the color combinations you have selected. If the cloth is light, then dark color paints will look beautiful and vice versa.
Before painting, iron the cloth to avoid wrinkles.
Before making the print on the good material, it is better to have a trial on the rough cloth.You can use
Ironing should be done only after drying.
To give richness to the painting, you can use thin and beautiful laces, kundans, beads, chem keys.
Different colors on same leaf also you can try as shown in the image.