ABOUT:
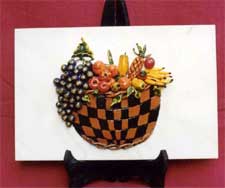
By using the following method and materials we can make a clay basket and different types of fruits, well arranged in the basket.
THINGS NEEDED:
China clay - 1/2 kg (approx.)
Ceramic Powder- 1/2kg(approx)
Ceramic tile- 1 piece (12x8 or 12x12 size)
Fabric Paint -Different Colours
Varnish -1 bottle
Glue.
ACCESSORIES:
Brushes
Roller
Knife
PROCEDURE:
1.Mix together China clay, ceramic powder and glue, and make it into a dough.
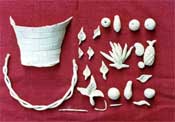
2.Take small quantity of this dough and roll them into balls of various sizes to make grapes.
Make 40-50 of them and paint purple. Same way shape up apples, bananas, oranges and whatever fruits you want to make. Color them and once the color dries up, varnish them.
3.To make leaves, take small quantity of the dough and roll it using the roller.
Cut it in the shapes of leaves (various shapes) and paint them green when dry, varnish them.
4.To make a basket take a portion of dough and flatten it and cut it out in the shape. Few horizontal lines and in between few vertical lines are pressed over the dough to get the shape of the basket.
Two small strings should be made with the dough and it should be twisted or plaited neatly and pasted to the top and bottom of the basket.
Now paint the basket with brown and black colours and varnish it.
FINISHING TOUCHES:
Take a Ceramic plate.
Wash it and let it dry.
First using glue, stick the three sides of your basket on the tile.
The top portion should be kept open. Fill the basket with clay dough to the brim.
Now arrange the fruits on the top portion of the basket.
Stick them in a beautiful way.
If a small piece of magnet is stuck at the back of each fruit it can be put up can separately on any metal piece.
This can even decorate our refrigerators.
Keep this fruit basket on a wooden stand. It will add decor to your dining or kitchen or even living room.
Hello viewers, this blog is for art and craft lovers. It is for people who posses special talents and help others to take advantage of their knowledge. so lets everyone share new techniques and ideas with one another.
Translate
Total Pageviews
Monday, October 12, 2009
Saturday, October 10, 2009
BATIK DESIGN
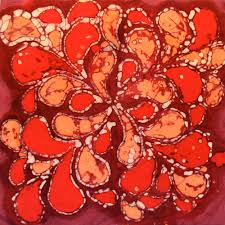
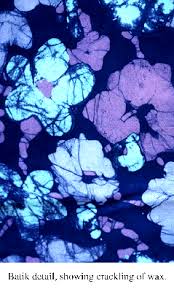
Batik is an ancient art supposed to be 2000 years old.The formation of crackles between colours is the interesting and beautiful part of this dying. To get crackle effect, wax is mixed with resin and used.
Now just try a very simple design of circles.
Materials Required-Cotton or silk cloth - take a square piece of any size

Dyes - Usually napthol dyes are used .
 Colours used for the design - yellow, red, brown, black.
Wax - Bee wax, paraffin wax resin (gum)
Brush - A small water colour brush,
a 1/2" size and a 2" size of the ordinary household paint brush.
These brushes can be used only for waxing.
Vessel to heat wax
Plastic bucket or big bowls to mix colours
A frame to fix the cloth
Gloves
Procedure :
Preparing the cloth :
Wash the cloth and starch it lightly. Starching is done to control the flow of wax.
Iron the cloth before you begin. Always choose white colour cloth or very light shade.
Now draw the design of circles on the cloth with charcoal or crayon and pin it to a frame.
Waxing & Dyeing : Use gloves while preparing wax and dye.
Preparing the wax :
Take 2 parts of bee wax and one part of paraffin wax into a vessel and heat it.
When it becomes liquid, add resin to it.
As wax is inflammable, use an electric heater or hot plate and avoid direct flame for heating.
Wax should be hot enough to penetrate the cloth. i.e. it should reach both sides of the material. The wax should look clear and not milky, to penetrate the cloth.
If the wax lies on the surface of the cloth, the dye will run under it and the resulting batik design will look smudgy.
To test whether the wax is of the right consistency, take a rough piece of cloth and apply the hot wax and see if the wax reaches both the sides of the material.
Preparing the dye bath :
Mix the dye with cold water.
The preparation should be mixed according to the directions given but not diluted too much.
Crackle :
Crackle is formed when the waxed cloth is dipped in the cold dye bath.
The wax cracks causing veins of darker colour on the lighter areas.
To have more crackle effects on the design the proportion of wax could be reversed to one part bee wax and two parts paraffin wax adding a little resin.
Paraffin wax crackles faster than bee wax.
The full effect of crackling can be seen when the wax is ironed out or removed by boiling
Applying the Wax & Dye :
Start waxing using a small brush changing to a larger size for broader areas.
Paint with good, even strokes about 1/4inch inside the line of your design.
When the brush is immersed in hot wax for the first time, the bristles will fuzz out.
Press them back into shape on the sides of the pan.
The layer of wax should not be very thin. Keep on h eating the wax while applying to retain the
clear consistency. Avoid crushing the cloth before dipping in the dye bath.
It can lead to too many crackles.
Wax should be 1st applied only on regions where you need white colour. i.e. the centre circle. When it dries the fabric should be dipped in the 1st light colour yellow.
Keep the cloth in the dye bath for about 15 minutes.
Remove and dry it by hanging on a line or flat on a news paper.
After drying, wax the regions where you need yellow.
Dip it in the next colour red, when it dries.
Now wax the regions where you need red.
Now dip brown. When it dries wax the regions where you need brown.
Final immersion is in black dye.
To achieve a good crackle effect the material is crumbled before the last immersion.
Dewaxing :
The final stage after dyeing and waxing. Now it is time to remove the wax from the cloth.
Wax can be removed by ironing with a moderately hot iron.
Keep a good layer of newspaper underneath the material and a single sheet on top while ironing. The paper absorbs the extra wax.
The paper should be renewed as they become soaked with wax.
If too much wax is remaining even after ironing the cloth should be dry cleaned.
Now the cloth is ready to use.
Try out this with any design, according to your idea to make a wonderful garment for yourself.
Now just try a very simple design of circles.
Materials Required-Cotton or silk cloth - take a square piece of any size
Dyes - Usually napthol dyes are used .
Wax - Bee wax, paraffin wax resin (gum)
Brush - A small water colour brush,
a 1/2" size and a 2" size of the ordinary household paint brush.
These brushes can be used only for waxing.
Vessel to heat wax
Plastic bucket or big bowls to mix colours
A frame to fix the cloth
Gloves
Procedure :
Preparing the cloth :
Wash the cloth and starch it lightly. Starching is done to control the flow of wax.
Iron the cloth before you begin. Always choose white colour cloth or very light shade.
Now draw the design of circles on the cloth with charcoal or crayon and pin it to a frame.
Waxing & Dyeing : Use gloves while preparing wax and dye.
Preparing the wax :
Take 2 parts of bee wax and one part of paraffin wax into a vessel and heat it.
When it becomes liquid, add resin to it.
As wax is inflammable, use an electric heater or hot plate and avoid direct flame for heating.
Wax should be hot enough to penetrate the cloth. i.e. it should reach both sides of the material. The wax should look clear and not milky, to penetrate the cloth.
If the wax lies on the surface of the cloth, the dye will run under it and the resulting batik design will look smudgy.
To test whether the wax is of the right consistency, take a rough piece of cloth and apply the hot wax and see if the wax reaches both the sides of the material.
Preparing the dye bath :
Mix the dye with cold water.
The preparation should be mixed according to the directions given but not diluted too much.
Crackle :
Crackle is formed when the waxed cloth is dipped in the cold dye bath.
The wax cracks causing veins of darker colour on the lighter areas.
To have more crackle effects on the design the proportion of wax could be reversed to one part bee wax and two parts paraffin wax adding a little resin.
Paraffin wax crackles faster than bee wax.
The full effect of crackling can be seen when the wax is ironed out or removed by boiling
Applying the Wax & Dye :
Start waxing using a small brush changing to a larger size for broader areas.
Paint with good, even strokes about 1/4inch inside the line of your design.
When the brush is immersed in hot wax for the first time, the bristles will fuzz out.
Press them back into shape on the sides of the pan.
The layer of wax should not be very thin. Keep on h eating the wax while applying to retain the
clear consistency. Avoid crushing the cloth before dipping in the dye bath.
It can lead to too many crackles.
Wax should be 1st applied only on regions where you need white colour. i.e. the centre circle. When it dries the fabric should be dipped in the 1st light colour yellow.
Keep the cloth in the dye bath for about 15 minutes.
Remove and dry it by hanging on a line or flat on a news paper.
After drying, wax the regions where you need yellow.
Dip it in the next colour red, when it dries.
Now wax the regions where you need red.
Now dip brown. When it dries wax the regions where you need brown.
Final immersion is in black dye.
To achieve a good crackle effect the material is crumbled before the last immersion.
Dewaxing :
The final stage after dyeing and waxing. Now it is time to remove the wax from the cloth.
Wax can be removed by ironing with a moderately hot iron.
Keep a good layer of newspaper underneath the material and a single sheet on top while ironing. The paper absorbs the extra wax.
The paper should be renewed as they become soaked with wax.
If too much wax is remaining even after ironing the cloth should be dry cleaned.
Now the cloth is ready to use.
Try out this with any design, according to your idea to make a wonderful garment for yourself.
Thursday, October 1, 2009
PAINTING ON PEEPAL LEAF
ABOUT: In India Hindus hold the great spiritual regard for the peepal tree and this tree has great importance among the Buddhists, as Lord Buddha attained enlightenment mediating under the Peepal tree. From bark of the Peepal tree reddish dye is extracted. Peepal leaves are used as ear drops and used to heal the wounds.
Painting on Peepal leaf is one of the oldest form of art, and shows the patience of the artists.
It is a delicate work of art originated in the southern India that is in Kerala. Its done on dry Peepal leaves.
This art form originated because the leaves of the peepal tree have a beautiful shape as they traper to a needle point. Nowadays only a few arists are left who practice this leaf art. Peepal Leaf Painting is great for making cards, wall hangings, book marks, gifts etc. Typically themes are painted in peepal leaves are Religious Indian figures, Animals, Scenery. But we can experiment with modern abstract art also.
MATERIAL REQUIRED:
1)Peepal leaves. 2)Oil paints. 3)Back ground sheet for leaf
Method:
The method is divided into 2 process
1. Drying the leaves
2. Painting on leaves
1 .Drying the leaves:
Place a few leaves in a bowl full of water for15 days or a month .Do remember to check it once every few days to see the condition of the leaves. The purpose of soaking the leaves is to remove the outer layer of the leaves. After being in water for long, the leaves get a film over them, which you need to clean by washing it off or use a brush periodically. Do remember to change the water with a fresh one periodically. Once the outer skin is lost, it leaves behind a beautiful bony structure and usually it will be off-white in color.Now dry it for a day and you get a leaf for painting.
2.Painting on leaves :
TIPS:
1)The most important tip is to be patient, while drying peepal leaves and handle them with care.
2)Add glitter to enhance the look of the painting.
3)Can also paint the peepal leaf in two colors to give half and half look.
4)Use golden color to make a border or highlighting or making jewellery
5)Cover with transparent sheet to protect the work.
6)Many wedding cards are decorated with dry peepal leaves.

