ABOUT: The art of
Madhubani painting, is the traditional style developed in mithila region in the
villages around Madhubani, Bihar. Madhubani literally means a forest of
honey. Now work is now being done on paper, cloth etc., for commercial purposes.
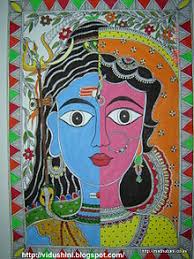
The themes and designs widely painted are the worship of Hindu deities
such as Krishna, Rama,Siva, Durga, Lakshmi, Saraswathi, Sun and Moon, Tulsi,
Plant, Court scenes, Wedding scenes, Social happenings around them etc.
Floral, animal and bird motifs, geometrical designs are used to fill up
all the gaps.
Madhubani paintings are of 3-styles:-
1.Brahmin Style
2.Tatoo Style
3.Kshatriya Style
METHOD:
1)Choose a design
2)First draw the required pattern on the trace paper and copy the design into the cloth/paper using carbon sheet.
3)If using Cloth Paint using fabric colors and let it dry well.Use Poster colours for paper.The colours are applied flat with no shading. There is normally a double line drawn for the outlines, with the gap between the lines filled by cross or straight tiny lines. In the linear painting, no colours are applied. Only the outlines are drawn.
4)Draw outlines using the black color and again leave it to dry for 24 hours.If applying on cloth iron on the back side of the cloth.
TIPS:
a)Choose a design that is colorful. It is often seen that tradionally there are only basic colours used like orange , green and red but you can add colurs like pink, purple, blue to make it more attractive.
b)Choose a design that it is easy to make. The design pattern should be simple and clear.
c)Trace the design well. Otherwise, definitely find yourself in trouble later. You can make improvements in designs like changing the features of face, as it generally seen features in Madhubani are not sharp.
d)Choose a theme.If you are making more than one painting then choose a theme eg.Krishna because each painting has certain meaning or situation
e)Don't limit youself .If you don't want a painting then you can always make a bookmark, card or table mats with Madhubani and laminate them.Add beautiful Border .Make sure you have a border . It will add new dimensions to your painting.
Madhubani paintings are of 3-styles:-
1.Brahmin Style
2.Tatoo Style
3.Kshatriya Style
It is a very
simple art form of painting. You Don’t need any specialized knowledge.
Materials Required :
1.Cloth or Handmade paper
2.Trace paper
3.Fabric colours(for cloth)
4.Poster colours (for paper)
5.Black out liner
6.Carbon sheet
Materials Required :
1.Cloth or Handmade paper
2.Trace paper
3.Fabric colours(for cloth)
4.Poster colours (for paper)
5.Black out liner
6.Carbon sheet
METHOD:
1)Choose a design
2)First draw the required pattern on the trace paper and copy the design into the cloth/paper using carbon sheet.
3)If using Cloth Paint using fabric colors and let it dry well.Use Poster colours for paper.The colours are applied flat with no shading. There is normally a double line drawn for the outlines, with the gap between the lines filled by cross or straight tiny lines. In the linear painting, no colours are applied. Only the outlines are drawn.
4)Draw outlines using the black color and again leave it to dry for 24 hours.If applying on cloth iron on the back side of the cloth.
TIPS:
a)Choose a design that is colorful. It is often seen that tradionally there are only basic colours used like orange , green and red but you can add colurs like pink, purple, blue to make it more attractive.
b)Choose a design that it is easy to make. The design pattern should be simple and clear.
c)Trace the design well. Otherwise, definitely find yourself in trouble later. You can make improvements in designs like changing the features of face, as it generally seen features in Madhubani are not sharp.
d)Choose a theme.If you are making more than one painting then choose a theme eg.Krishna because each painting has certain meaning or situation
e)Don't limit youself .If you don't want a painting then you can always make a bookmark, card or table mats with Madhubani and laminate them.Add beautiful Border .Make sure you have a border . It will add new dimensions to your painting.


